
How to set up and run Wholehog on your Shopify store.
Requirements
- A Shopify store on Basic, Grow or Advanced. Wholehog uses Shopify’s native B2B companies and catalogues, which these plans include.
- An Online Store 2.0 theme, such as Dawn or Horizon, for Wholehog’s app blocks. The app embeds (content lock and hiding theme prices) work with any theme. Everything is added in the theme editor, so no code is needed. See Theme compatibility.
- Customer accounts switched on, so trade buyers can log in. Buyers sign in with a one-time code emailed by Shopify; there are no passwords to manage.
Theme compatibility
Wholehog adds two kinds of things to your theme, both in the theme editor (Online Store > Themes > Customize). Nothing is written into your theme’s code, so removing Wholehog leaves your theme as it was.
- App blocks go inside a section of a template, such as the product page, and you choose where they sit. They need an Online Store 2.0 theme. Shopify’s own themes, such as Dawn, Horizon and Refresh, and most Theme Store themes released since 2021 are Online Store 2.0.
- App embeds are switched on for the whole theme under App embeds. They work with every Shopify theme, including older (vintage) themes.
Check which kind of theme you have
- Go to Online Store > Themes and choose Customize on your theme.
- Open a product page and choose Add block in the product information section (or Add section).
- If the panel has an Apps tab listing Wholehog’s blocks, your theme is Online Store 2.0. If there’s no Apps option, it’s a vintage theme.
On a vintage theme, the Trade content lock and Hide theme prices embeds still work, and so does everything that doesn’t depend on the theme: approving accounts, tiers, fixed and contract prices, the trade order minimum and checkout pricing. The trade application form, the Trade price block, the Request a quote block and the quick order page can’t be added. To use them, move to an Online Store 2.0 theme; Dawn and Horizon are free.
Where each part goes
| Part | Type | Where it goes | Plan |
|---|---|---|---|
| Trade application form | App block | Any template; usually a page template you create | Free |
| Trade price | App block | Product template | Free |
| Request a quote | App block | Cart template | Pro |
| Quick order form | App block | A page template you create | Pro |
| Trade content lock | App embed | Every page; it acts on the collections and products you lock | Free |
| Hide theme prices | App embed (optional) | Every page, or product pages only | Free |
Moving, hiding or removing a block, and turning an embed off
- Move a block: in the theme editor’s left sidebar, drag the block by its handle to a new place in its section, or into another section that accepts app blocks.
- Hide a block: hover over it in the sidebar and choose the eye icon. It stays in the template with its settings, ready to show again.
- Remove a block: select it and choose Remove block at the bottom of its settings.
- Turn an embed on or off: choose App embeds in the theme editor’s left bar, then use the switch beside the embed. Expand it to see its settings.
Nothing reaches your store until you press Save. A block’s settings are covered in its own section below.
Checking what’s on, and draft themes
The Your theme card on Wholehog’s home page shows whether each block is in your live theme and whether each embed is switched on. Each line has a link that adds the block or switches the embed on, or, once it’s there, opens it so you can change or remove it. These links open your live (published) theme. To set up a theme before you publish it, open that theme in the theme editor from Online Store > Themes and add the blocks and embeds in the same way; they’ll be there when you publish it.
Installing and the setup guide
- Install Wholehog from the Shopify App Store and approve the permissions.
- Open the app. The home page shows a setup guide that ticks off each step as you go.
- Go to Settings and save the email address that should receive new trade applications. It is filled in with the store owner’s email to start with.
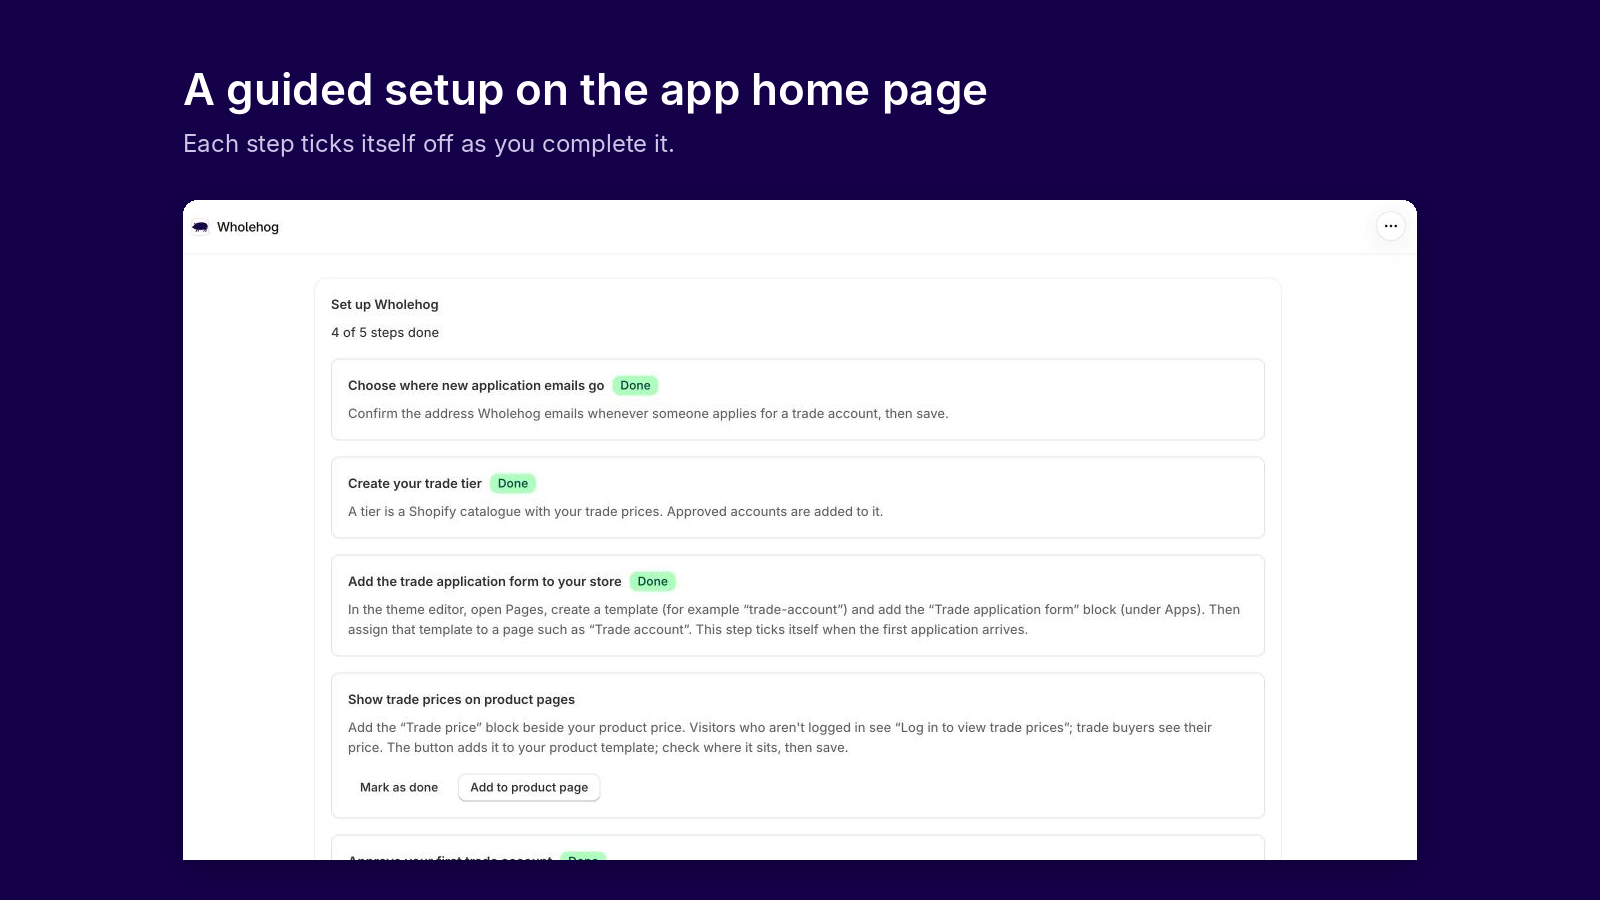
The setup guide links you straight into the theme editor for each block. Steps that Wholehog can’t detect on its own, such as placing a block in your theme, have a Mark as done button.
Trade application form
The form is an app block, so it needs an Online Store 2.0 theme. It usually goes on a page of its own:
- In Wholehog’s setup guide choose Open theme editor, or go to Online Store > Themes > Customize.
- From the page menu at the top of the theme editor choose Pages, then Create template. Name it, for example “trade-account”, base it on Default page and create it.
- In the new template choose Add section (or Add block), open the Apps tab and choose Trade application form. Press Save.
- In the Shopify admin go to Online Store > Pages, add a page such as “Trade account”, choose your new template under Template and save. Then add the page to your menu.

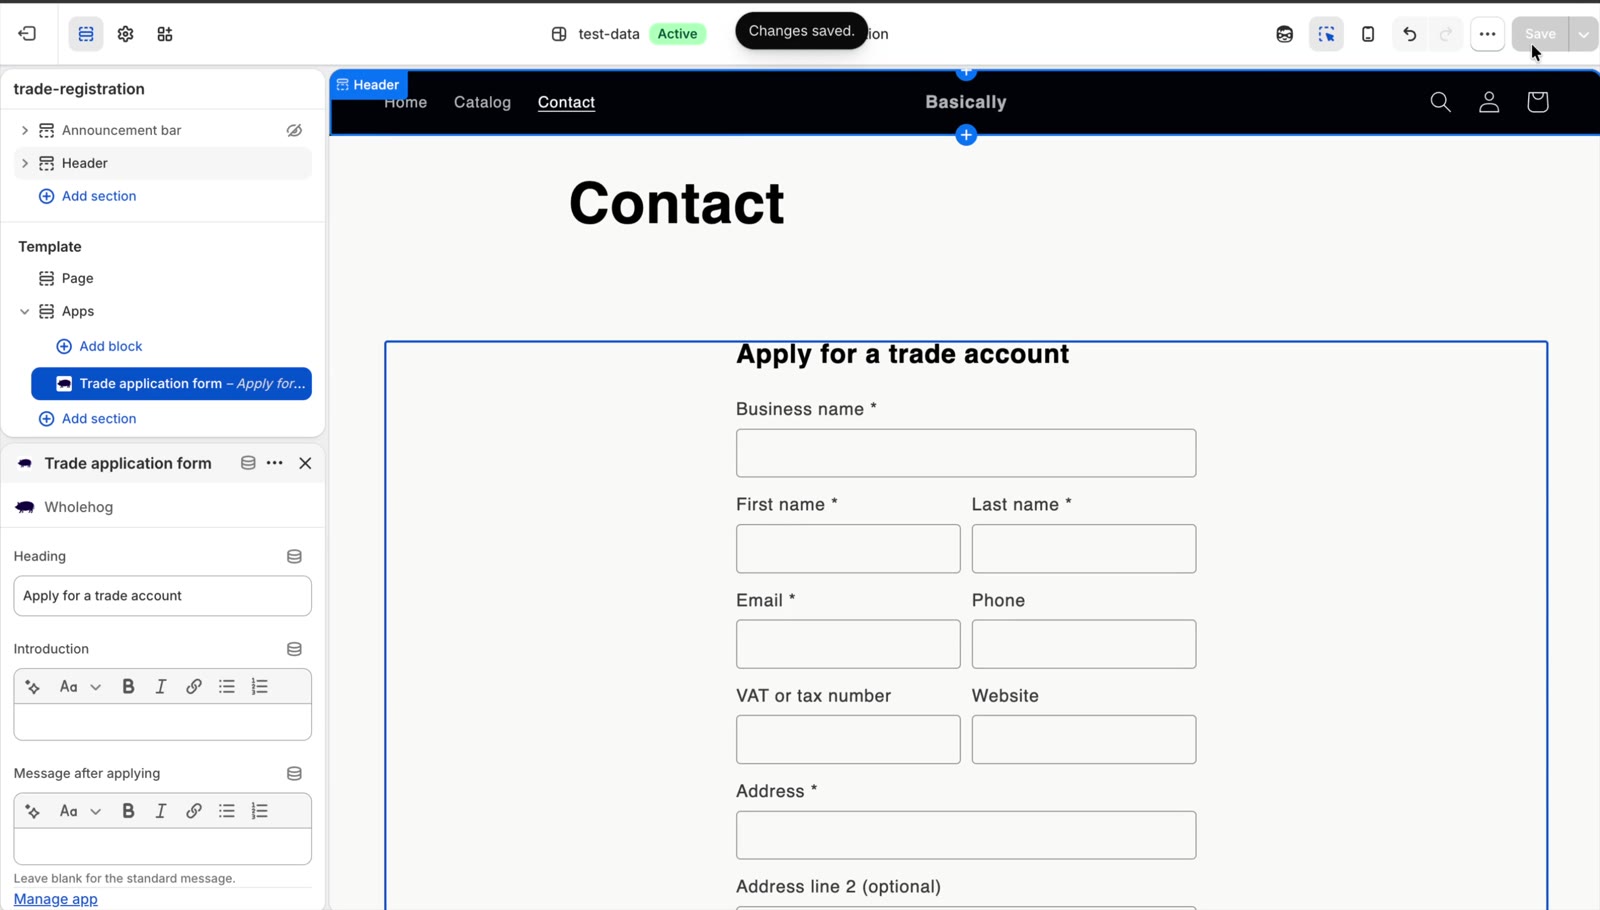
The block’s settings are Heading, Introduction and Message after applying (leave it blank for the standard message). To take the form down, remove the block or unpublish the page.
The form always asks for business name, contact name and email. In Settings you can set each of these to Hidden, Optional or Required:
- phone number
- VAT or tax number
- website
- address
You can also add up to 10 custom fields: short answer, long answer, drop-down or tick box.
Customers who are already logged in get the form filled in for them, and existing trade buyers see a note that they already have a trade account. A buyer who was already logged in when you approved them is asked to log out and back in, so Shopify starts their trade session. The form has built-in spam protection, and each email address can only have one open application at a time.
Reviewing applications
New applications appear under Applications, with tabs for each status and a search by business, name or email. Open one to see the details and its history, then:
- Approve: Wholehog creates the Shopify B2B company, a location and the buyer as its contact (reusing their customer account if they already have one), adds them to your default trade tier and emails them a link to log in.
- Request information: write a note and it is emailed to the applicant. They reply by email.
- Reject: add a reason if you like; it goes in the email. Rejected applications are deleted after 90 days, and you can reopen one before then.

Shopify only lets a customer be the contact for one company. If an applicant is already a contact for another company, Wholehog stops before creating anything and tells you why.
Auto-approve
To approve some applications without reviewing them, go to Settings > Auto-approve, switch it on and add:
- email domains, such as
example.com. Subdomains match too (shop.example.com), but similar names don’t (badexample.com). Free email providers such as gmail.com can’t be added. - countries, as two-letter codes such as
GB, IE. This uses the address on the application, so set the address field to Required in the form settings.
If you set both, an application has to match both. A matching application is approved as soon as it’s sent: the buyer gets the “approved” email instead of “received”, joins your default tier, and you get an email saying it was approved automatically. Its history shows that it matched the rules. Anything else waits in Applications as usual. Auto-approve is included in the Free plan.
Emails
Wholehog sends these emails for you:
- to the applicant: application received, approved (with a log-in link), more information needed, and rejected
- to you: a new application has arrived, or one was approved automatically, with a link to it in your admin
Emails come from Wholehog’s sending address with your store’s name as the sender. When an applicant replies, the reply goes to your store’s customer contact email. When you reply to a new-application alert, it goes to the applicant. Emails are in English for now.
Trade tiers
A tier is a percentage off your retail prices for a group of trade accounts. Go to Trade tiers, give the tier a name and a discount, and Wholehog creates the B2B market and catalogue in Shopify. You can add approved accounts that aren’t in a tier yet, change the discount, or delete the tier, which puts its accounts back on retail prices.
- New approvals join the default tier, which is the first one in your list.
- Free includes 1 tier. Pro includes up to 3.
- Below Shopify Plus, Shopify allows 3 active B2B catalogues in total. That limit includes any B2B catalogues you made yourself, and Wholehog tells you if you have hit it.
You can set up a tier before anyone has applied. It shows as Waiting for first account and goes live in Shopify when you approve your first trade account, because Shopify won’t create a B2B market with no companies in it.
To change which tier is used for new approvals, choose Make default for new approvals on that tier. To move an account, use Move to… beside it; the buyer keeps trade prices throughout. Shopify won’t keep a B2B market with no companies, so a tier’s last account can’t be moved out.
Fixed prices, quantity breaks and order rules (Pro)
Every variant gets its tier’s percentage off unless you give it something more specific. On Trade tiers, open Fixed prices, quantity breaks and order rules for a tier, then:
- Export a CSV of your variants. Leave the search blank for everything, or narrow it with a Shopify search such as
vendor:Acmeortag:trade. You can also export only the variants that already have a fixed price or rule. - Fill in the columns you need and save the file as CSV.
- Upload it and press Check file. Wholehog shows how many variants will change, the first changes, and any rows it will skip with the reason.
- Press Apply. The prices and rules are saved to the tier’s Shopify catalogue, so they show in your theme, cart and checkout straight away.
The columns are:
- Variant ID and SKU: how each row is matched. Variant ID is used first; if it’s empty, the SKU is used, as long as no other variant shares it.
- Product, Variant and Retail price: for reference only.
- Fixed price: this tier’s price for the variant. Leave it empty to go back to the percentage.
- Break 1–5 quantity and price: quantity price breaks, for example 12 at 55.00 and 24 at 50.00. Breaks need a fixed price on the same row, and each break must cost less than the one before.
- Min quantity, Max quantity and Increment: the variant’s order rule, for example min 6 in 6s for a case of 6. The minimum and maximum must be multiples of the increment, and breaks must fit the rule. Leave all three empty for no rule.
Each row sets that variant’s whole state for the tier, so an empty break column removes that break. Variants that aren’t in the file don’t change, and a file without the rule columns leaves rules as they are. Shopify enforces order rules in the cart and at checkout, and the Trade price block and quick order page show them to buyers.
One file can hold up to 5,000 rows, and a template export includes up to 5,000 variants. For a bigger catalogue, export and upload in parts, for example by vendor.
Contract prices (Pro)
A contract price is a price for one trade account only, on top of its tier. Go to Contract prices, open the account, and use the same export, upload, Check file and Apply steps as for fixed prices. The file has a Contract price column in your store’s currency; leave it empty to remove a price. Remove all clears every contract price for the account.
- A contract price is only used when it’s lower than the buyer’s tier price. If the tier price or a quantity break is lower, the buyer pays that instead.
- The buyer sees “Your contract price” in the Trade price block, and their contract prices on the quick order page. Your theme’s own price shows the tier price, so the block says the price above may differ and that this is what they’ll pay.
- At checkout the price is applied by an automatic discount called Wholehog contract prices, which Wholehog creates in Discounts the first time you save one. Leave it switched on.
- The discount combines with your order and shipping discounts, but not with other product discounts. If one of your own product discounts gives a buyer a better price on a line, Shopify uses that one instead.
- Each account can have roughly 2,000 contract prices, in your store’s main currency.
If you move from Pro to Free, contract prices are kept but no longer shown or charged. They come back if you return to Pro.
Trade order minimum (Pro)
To set a minimum order value for trade buyers, go to Settings > Trade order minimum and enter an amount in your store’s currency. It counts the order before tax and shipping. A trade buyer below the minimum can still fill their cart, but checkout shows “The minimum trade order is …” and won’t let them pay until they add more. Retail customers are never affected.
To give one account a different minimum, open it under Contract prices and fill in Minimum order value for this account. Enter 0 for no minimum, or leave it blank to use the store’s. Wholehog creates a checkout rule called Wholehog trade order minimum in your checkout settings the first time you save a minimum.
Minimum and maximum quantities and case sizes for individual products are set per tier, as order rules (see above).
Trade price block
The Trade price block is an app block for the product template, so it needs an Online Store 2.0 theme. To add it:
- In Wholehog’s setup guide choose Add to product page. The theme editor opens on your product template with the block already added to the main product section.
- Check where it sits: drag it in the sidebar to just below Price, then press Save.
To add it by hand, open the product template, choose Add block in the product information section, open the Apps tab and choose Trade price. If your theme has more than one product template, add the block to each one you use.
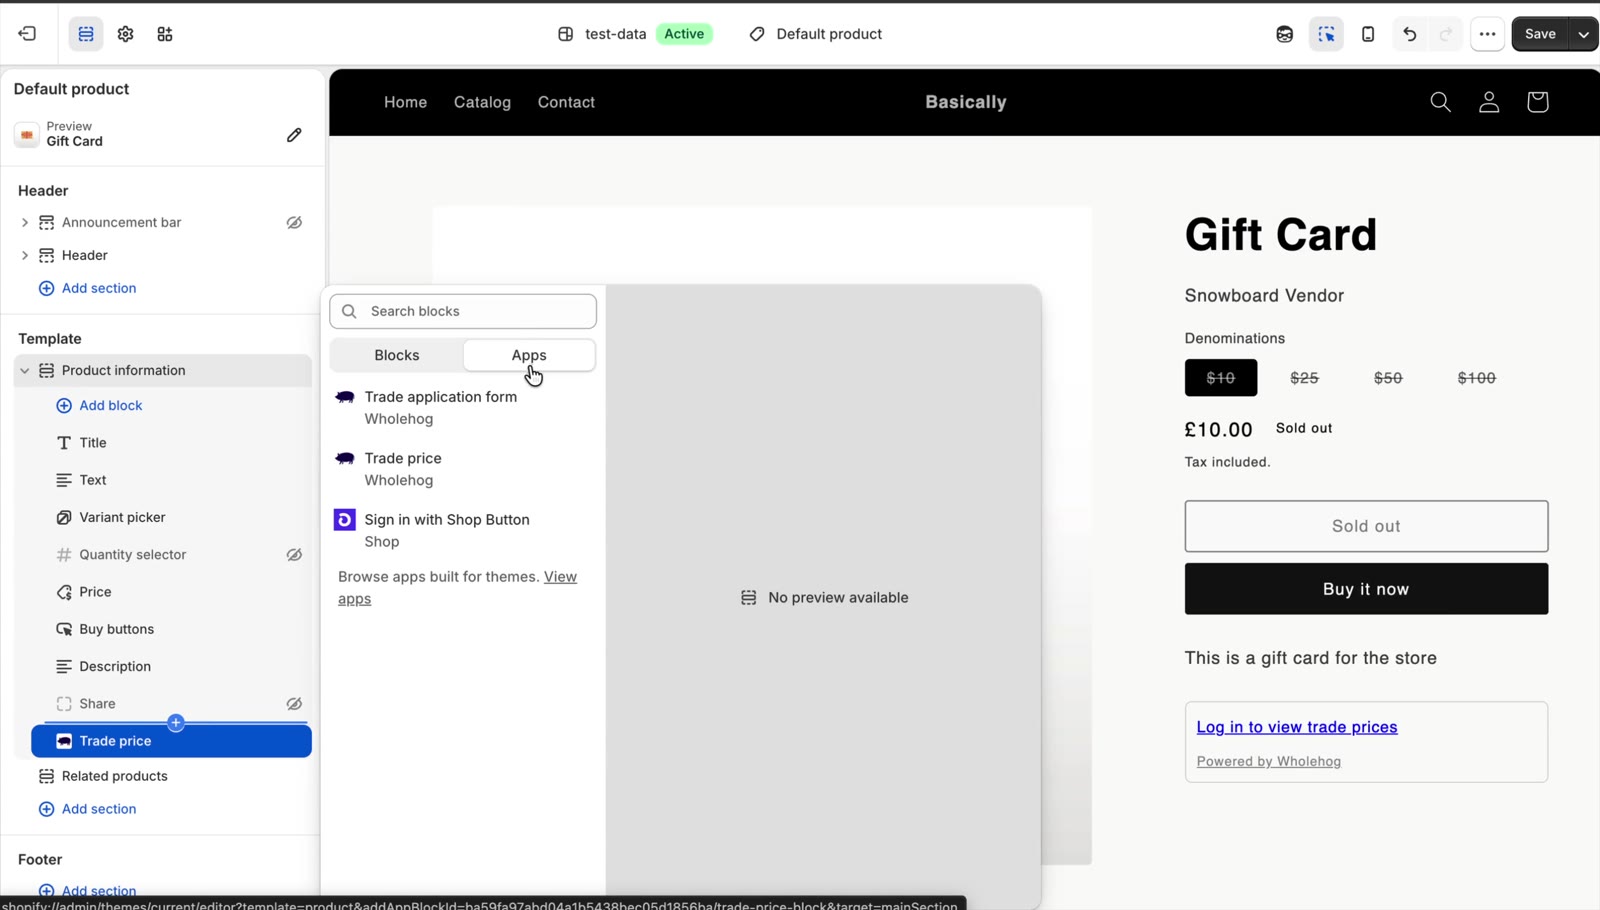

The block’s settings are Label for trade buyers (leave it blank for “Your trade price”), Show “Log in to view trade prices” to other visitors (on to start with) and Trade application page, which adds an “Apply for a trade account” link.
The setup guide’s link adds a new block each time you use it. If a section ends up with two, only the first shows on your store, and the theme editor labels the extra one so you can remove it.
- Visitors who aren’t logged in see “Log in to view trade prices”, with an optional link to apply for a trade account.
- Logged-in retail customers see a short note instead.
- A buyer who was already logged in when you approved them is asked to log out and back in. Shopify only starts a trade session at login, so until then they see retail prices. The approval email says this too.
- Trade buyers see their trade price for the selected variant, with a note that this is their price and what they’ll pay at checkout, along with any minimum, maximum or pack-size rules and quantity price breaks.
Wholehog never rewrites your theme’s own price. Trade buyers already see their tier price in the theme, cart and checkout because it is a native Shopify catalogue price.
Content lock
Under Content lock, pick the collections and products that should be trade only. Then switch on the Trade content lock app embed, which works with any theme:
- On the Content lock page choose Turn on the lock in your theme. The theme editor opens at App embeds with Trade content lock already switched on.
- If you like, set Send other visitors to: leave it blank for the log-in page, or choose your trade application page to invite them to apply. Press Save.
To turn the lock off, open App embeds, switch Trade content lock off and save. Your list of locked collections and products is kept for next time.
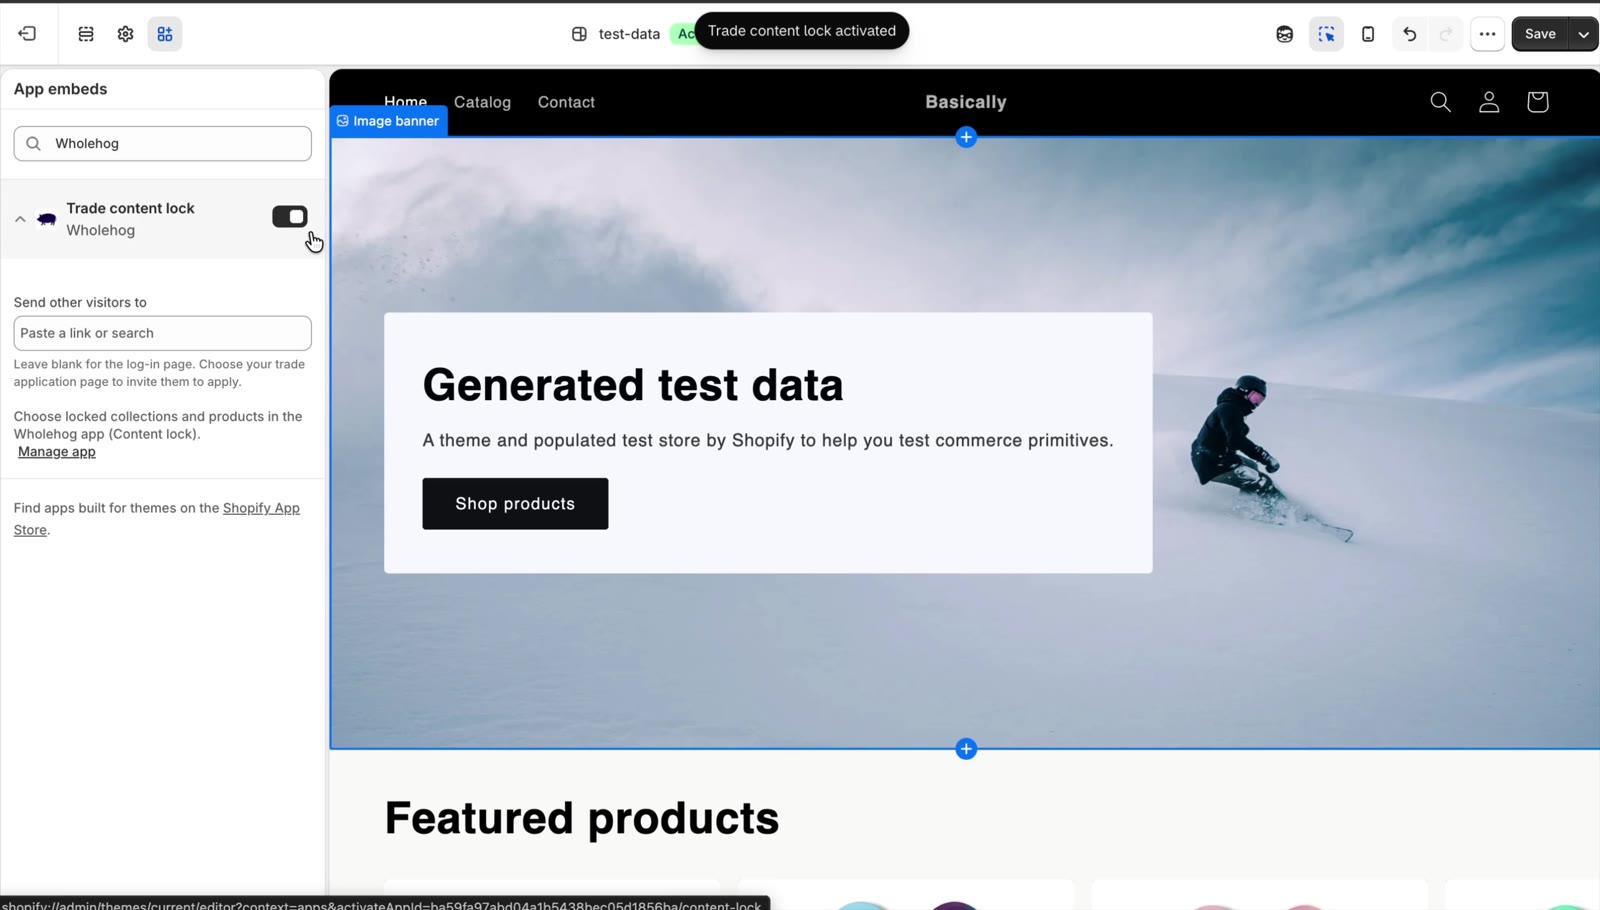

Anyone without a trade account who opens a locked product, a locked collection or a product inside one is sent to the login page or a page you choose. Locked pages are marked so search engines don’t index them. Trade buyers and the theme editor are never redirected.
The lock works by redirecting visitors, so it keeps trade ranges out of sight for normal shoppers. It isn’t a security barrier against someone determined to see the page, so don’t put anything truly confidential on a locked page.
Hiding theme prices
If you don’t want some visitors to see your retail prices, switch on the optional Hide theme prices app embed. It works with any theme. On Wholehog’s home page, under Your theme, choose Turn on beside Hide theme prices: the theme editor opens at App embeds with it switched on. Set its options and press Save. To stop hiding prices, switch it off under App embeds and save. Its settings are:
- Hide prices from: visitors without a trade account, trade buyers, or everyone
- Where: everywhere, or product pages only
- Theme and Price selector: a preset for Dawn- and Horizon-family themes, or Other theme with your own CSS selector for your theme’s prices, such as
.product-price
It never hides the trade price block. As it depends on your theme’s markup, it is offered on a best-effort basis.
Quick order page (Pro)
The quick order form is an app block for page templates, so it needs an Online Store 2.0 theme and the Pro plan. To set up the page:
- In the theme editor choose Pages from the page menu, then Create template. Name it, for example “quick-order”, and base it on Default page.
- Choose Add section, open the Apps tab and choose Quick order form. Press Save.
- In Online Store > Pages, add a page such as “Quick order” with the new template. Add it to your menu and send the link to your trade buyers.


The block’s settings are Products from (a collection; leave it blank for all products), Products per request (how many load at a time, 250 to start with) and Show to customers without a trade account. That last one is off to start with, so other visitors see a link to log in; switch it on to let anyone order from the page at the prices they’d normally see. On the Free plan the block shows nothing on your store and a note in the theme editor.
Buyers see each product at their own price, including any contract prices, and can switch between five views, all filling the same order:
- Products: grouped by product, with entry boxes shaped to fit, such as a size run or a colour by size grid
- List: one row per variant
- Compact: one line per product, with options in a pop-up
- Order by SKU: paste or upload SKU and quantity lines, with any problems listed row by row
- Previous orders: the buyer’s last 10 orders, each with Add to order to order the same lines again. Lines for products that are sold out, deleted or not on the page are left out, and the buyer is told how many were added.
Search matches every word across titles, SKUs and options, and an exact SKU jumps straight to that variant. A bar at the bottom shows the number of lines and the total, with one button to add everything to the cart. Set the default view in Settings; buyers’ own choice is remembered in their browser.
Under Settings > Quick order page you can also untick views you don’t want buyers to use. At least one has to stay, and the default must be one of them. With only one view left, the tabs are hidden.
Quantity boxes follow each tier’s order rules: a variant sold in 6s with a minimum of 6 shows “6+”, and a typed quantity is rounded up to the next valid amount (and down to the maximum) when the buyer leaves the box. Order by SKU and Previous orders round in the same way.
Previous orders only lists orders the buyer placed themselves, not orders placed by colleagues at the same company.
Request a quote (Pro)
Trade buyers can send you their cart as a quote request. You reply with your prices, and they pay through Shopify’s invoice.
Adding the block
Request a quote is an app block for the cart template, so it needs an Online Store 2.0 theme and the Pro plan.
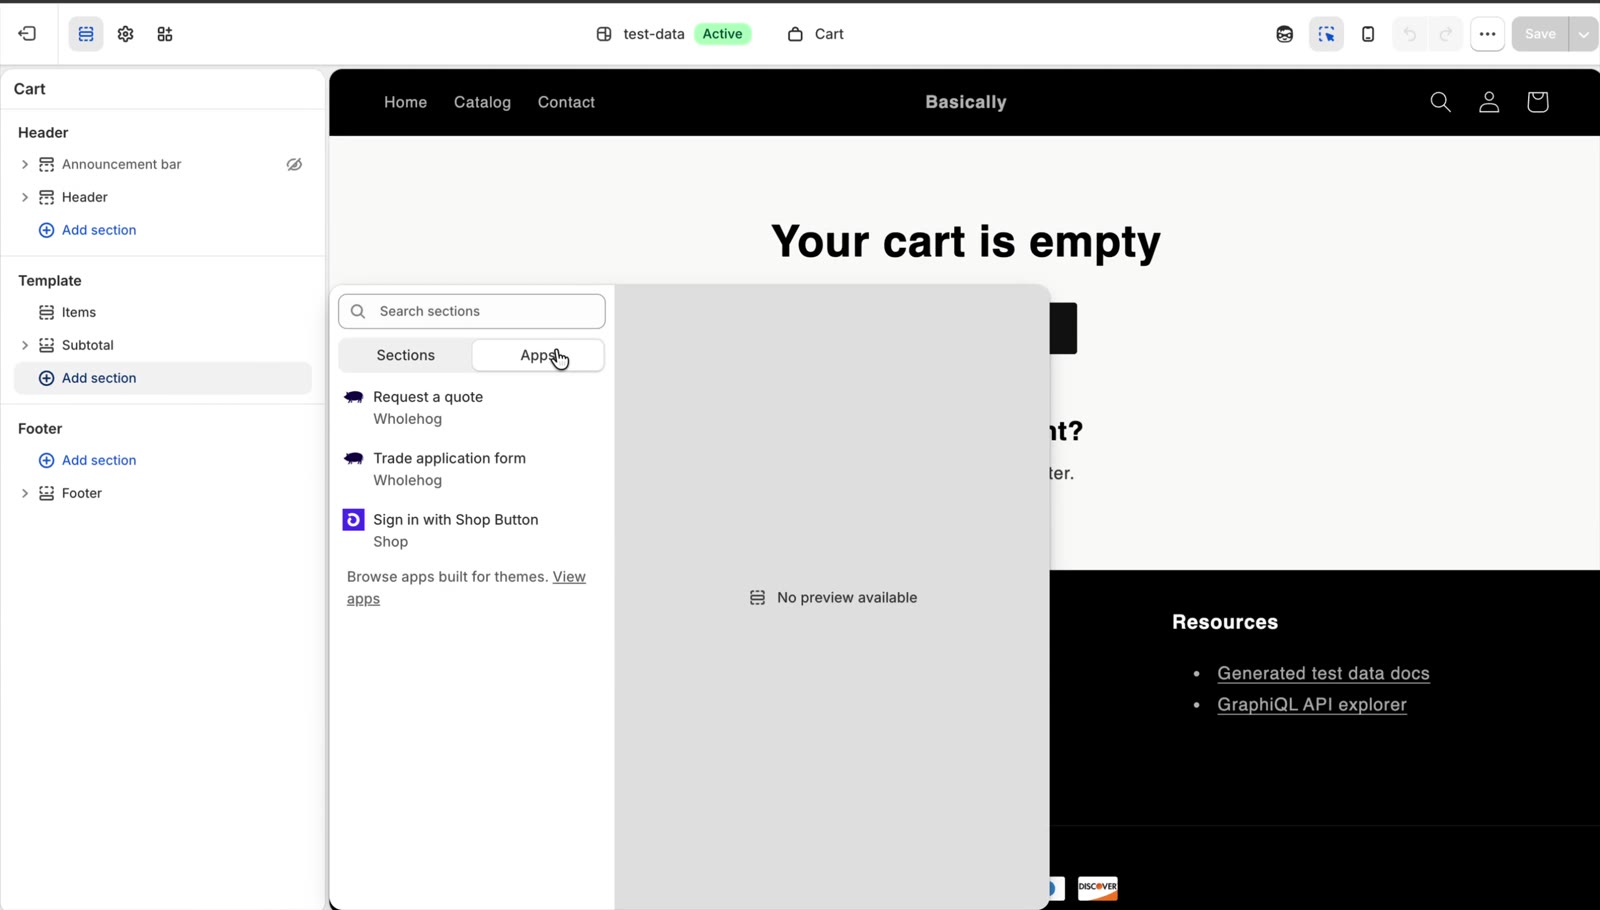
- On Wholehog’s home page, under Your theme, choose Open theme editor beside Request a quote. The theme editor opens on your cart template with the block added.
- To add it by hand instead, open the Cart template, choose Add section (or Add block), open the Apps tab and choose Request a quote.
- If you like, change its Heading (leave it blank for “Request a quote”), then press Save.
The block appears only for logged-in trade buyers, on the cart page. Logged-out visitors and retail customers never see it, and on the Free plan it shows nothing on your store and a note in the theme editor.

Handling requests
A buyer opens the panel on their cart, adds a note if they like and presses Send quote request. They’re shown a quote number, such as Q-1001, and their cart is left as it is. You get an email, and the request appears under Quotes > Requested with the buyer’s own prices: their tier, fixed prices, quantity breaks and contract prices. Open it to:
- Send quote: change any quantity (0 removes a line) or quote price (leave it blank for their price), add a message and send. Wholehog creates a Shopify draft order for the buyer’s company with those prices fixed, and Shopify emails the buyer its invoice with the quote number and the date it’s valid until. If the company has payment terms, the draft order uses them.
- Decline request: add a reason if you like; it’s emailed to the buyer.
- Withdraw quote: on a quote you’ve sent, this deletes its draft order, so the invoice link stops working.
Quotes are valid for 30 days unless you change it under Settings > Quotes. When a quote expires, its unpaid draft order is deleted and the quote moves to Closed; when the buyer pays, it moves to Ordered. Automatic discounts, including Wholehog’s contract prices, aren’t taken off a quoted price a second time.
Plans and billing
Wholehog has a Free plan and a Pro plan at $19 a month with a 14-day free trial. Billing goes through your Shopify invoice. You can see your plan, and change it, under Settings > Plan. See the pricing table for what each plan includes. On Free, the trade application form and the logged-out Trade price block carry a small “Powered by Wholehog” link; Pro removes it. Trade buyers never see it.
Uninstalling and your data
Remove Wholehog under Settings > Apps in your Shopify admin, and take any links to the trade pages out of your menu. Wholehog’s blocks and embeds stop showing once the app is removed.
The companies, customers and catalogues Wholehog created are part of your Shopify store, so they stay there after you uninstall, and tier accounts keep their tier prices. If you don’t want that, delete your tiers in Wholehog before uninstalling. Wholehog’s own data (applications, settings and history) is deleted when Shopify asks us to, about 48 hours after you uninstall. More in our privacy policy.
Support
Email matt@rococodigital.co.uk with your .myshopify.com address and we’ll help.